Introduction: Why a Two-Zone Fire is a Game Changer for Grilling
Charcoal grilling is a bit of art and a bit of science. If you’ve ever ended up with burgers that are burnt on the outside but raw in the middle, or chicken that’s charred black before it’s cooked through, then two-zone grilling is about to be your new best friend. Setting up a two-zone fire on a charcoal grill simply means creating two distinct heat zones: one super hot and one cooler. This method is a game changer for both beginners and seasoned grillers because it gives you much better control over your cooking temperature. Instead of constantly fighting flare-ups or ending up with dry, overcooked meat, you’ll be able to sear over high heat on one side and then move foods to finish cooking gently on the other side, and the result is juicier, more evenly cooked food with much less stress.
In this step-by-step guide, we’ll break down exactly how to set up a two-zone fire for charcoal grilling. We’ll keep it casual and straightforward, so you can follow along even if it’s your first time firing up a grill. By the end, you’ll see why this technique is such a game-changer and how to use it for everything from steaks and burgers to whole chickens and veggies. Let’s dive in and get you grilling like a pro!
What You’ll Need – Basic Tools and Materials
Before we start, make sure you have the following tools and materials ready. Don’t worry, no fancy gadgets are required — just the basics for a successful two-zone charcoal grilling setup:
- Charcoal grill: A kettle-style charcoal grill or any grill with a lid will work best for two-zone grilling.
- Charcoal: Briquettes or lump charcoal – your choice. Briquettes burn steadily and are great for longer cooks, while lump charcoal burns hotter and faster. Either type will do the job here.
- Chimney starter (optional, but recommended): A charcoal chimney makes lighting coals easier and quicker without needing lighter fluid. It’s a staple for many grillers because it gets your coals evenly red-hot.
- Lighter or matches: If you’re using a chimney, you’ll need a way to light the newspaper or fire starter in it (a long lighter or matches). If you don’t have a chimney and plan to use lighter fluid, you’ll need a lighter or matches for that too – just be sure to follow the fluid’s safety instructions.
- Long-handled tongs or metal spatula: You’ll need a tool to safely arrange the coals and to move food around. Heat-resistant grill gloves are also a great idea for handling hot equipment or adjusting coals.
- Clean cooking grate: Make sure your grill’s cooking grate is clean and ready. Also, empty any old ash from the bottom of the grill for better airflow (ash can block vents and make temperature control harder).
- (Optional) Foil drip pan: If you plan on slow-cooking or roasting something on the indirect side, a disposable aluminum pan is handy. You can place it under the grill grate on the empty side to catch drippings and help regulate the heat.
With these essentials on hand, you’re ready to rock the two-zone setup. Now, let’s get into the fun part – setting up those two heat zones step by step.
How to Set It Up – Step-by-Step Instructions for Arranging Coals
Setting up a two-zone fire on your charcoal grill is straightforward. We’ll walk through each step in order. Feel free to grab a cold drink and follow along:
- Prep and Clean the Grill: Begin with a safe, clean grill. Open the lid and remove the cooking grate for now. Dump out any old ashes from the bowl if you haven’t already – good airflow is key for controlling heat. Make sure the bottom vents are open to allow oxygen to feed your charcoal once it’s lit.
- Measure Out Your Charcoal: For a standard kettle grill, use roughly a full chimney’s worth of charcoal. That’s about enough briquettes to cover one half of your grill’s charcoal grate in a single layer. (If you’re not using a chimney, just pour out enough charcoal to create a pile on one side of the grill – roughly covering half the charcoal grate area.)
- Light the Charcoal: The easiest way to light charcoal is with a chimney starter. Fill the chimney with your charcoal and place some crumpled newspaper or a fire starter underneath it, then light it up. In about 10–15 minutes, the coals on top will be starting to turn gray-white (ashed over) and you’ll know they’re ready. No chimney? You can still do this: pile your charcoal on one side of the grill, carefully squirt a bit of lighter fluid over the coals (following the instructions, and never add fluid to hot or lit coals), and ignite them. Let the coals burn until they’re covered with a light gray ash before you proceed to the next step.
- Arrange the Coals for Two Zones: Once your coals are hot and glowing, put on grill gloves for safety and carefully pour or move all the coals to one side of the charcoal grate. Use your tongs or a metal spatula to nudge them into place if needed. All the coals should be piled on one half of the grill only. This creates a concentrated bed of heat on that side. The other half of the grill should have no coals at all. Congratulations – you’ve just made a two-zone setup! One side is now your direct heat zone (right above the hot coals) and the opposite side is your indirect heat zone (no coals underneath).
- Optional – Add a Drip Pan: If you’re cooking something that will render a lot of fat or require a long cooking time, consider adding a drip pan. Place a foil pan on the empty side of the charcoal grate (under where your food will be on the indirect side). The pan will catch dripping grease (helping prevent flare-ups) and help moderate the heat for low-and-slow cooking. This step isn’t necessary for quick grilling, but it’s a handy trick for longer BBQ sessions.
- Replace the Grate and Preheat: Using tongs or a heatproof tool, set your cooking grate back in place over the coals (and over the drip pan, if you’re using one). Close the lid. Make sure the grill’s top vent is open (you’ll adjust it later as needed). Let the grill heat up for about 5–10 minutes. This preheats the cooking grate, which helps prevent food from sticking, and it gives the grill a chance to stabilize its temperature across the two zones.
- Start Grilling (Two Zones Ready): Now you have a classic two-zone fire ready to go – a hot side for searing and a cooler side for indirect cooking. Place your food on the appropriate side of the grill and get cooking! Remember that you can always move foods from one zone to the other as needed: sear on the hot side, then finish on the cooler side, or vice versa.
By following these steps, you’ve set up a versatile grilling environment. It might feel like a bit of extra setup compared to dumping coals everywhere, but the payoff is huge. You’ll find that having a two-zone fire gives you much more control and confidence while grilling.
Managing the Fire – How to Control Heat Zones and Maintain Temperature
Now that your two-zone fire is going, let’s talk about managing the fire as you cook. Grilling is as much about fire control as it is about the food. With two heat zones, you have a lot of flexibility. Here are some tips for keeping your temperatures in check and making the most of your setup:
- Use the Vents: Your charcoal grill’s vents act like temperature dials. Opening the vents lets in more oxygen and makes the fire hotter, while closing them slows the oxygen flow and cools the fire. A good practice is to start with the bottom vents open and then use the top vent to fine-tune the temperature. Make small adjustments (open or close a little at a time) and give the grill a few minutes to respond each time.
- Lid Management: Keep the grill lid closed whenever you can, especially when cooking on the indirect side. The lid traps heat and smoke inside, so your food cooks more evenly (like in an oven). Only lift the lid when it’s necessary to check or flip your food. For quick sears on the direct side, it’s okay to have the lid off briefly, but remember that every time the lid is open, heat escapes and the temperature drops. Work quickly and get the lid back on to keep the heat steady.
- Manage Flare-Ups: If a flame flares up from dripping fat (for example, a burger causes a sudden flare), don’t panic. Simply move the food to the cool indirect side immediately to get it away from the flames. You can also briefly close the lid to smother the flame. Once the flames subside, return the food to the direct heat side and continue cooking.
- Add Coals as Needed: For longer grilling sessions, you may need to add more charcoal to maintain heat. The best way is to light additional coals in a chimney starter and pour them onto the existing coals once they’re hot. If you don’t have a chimney ready, you can carefully add a handful of unlit briquettes to the lit coals on the hot side. Just add 4–5 at a time so you don’t smother the fire, and they’ll slowly catch and keep the heat going.
- Move Foods Between Zones: You’re not stuck cooking in one spot. If something is cooking too fast or starting to burn on the hot side, slide it over to the indirect side to slow things down. If an item on the indirect side needs a bit more sear or char, move it to the direct side for a quick finish. This flexibility ensures everything cooks at the right pace.
Best Foods to Cook on Direct vs. Indirect Heat Zones
One of the best things about a two-zone charcoal fire is how versatile it makes your grill. Different foods cook better over direct or indirect heat, and now you’ve got both at your disposal. Here’s how to know which foods belong in which zone (and how to use both zones together for awesome results):
Direct Heat Zone (Hot Side): This is the side right above the coals – it’s blazing hot and great for fast, high-heat cooking. Use the direct zone for foods that you want to sear or cook quickly:
- Steaks and Chops: Thin steaks, pork chops, lamb chops, and the like do great over direct heat to get a nice sear and char on the outside. For thicker steaks (or cuts like a big T-bone), sear them on the hot side first, then move them to the indirect side to finish cooking to your desired doneness. (Many grillers also do the reverse: cook thick cuts mostly on indirect, then give them a final sear on direct at the end.)
- Burgers and Sausages: Burgers love direct heat – it gives them that nice crust on the outside. Just be ready to manage flare-ups from dripping fat by shifting them to indirect if needed for a moment. The same goes for bratwursts, hot dogs, or sausages: start them over direct heat to get a tasty char, and move them around if flames kick up to avoid burning.
- Seafood: Shrimp, scallops, and thinner fish fillets cook very quickly over direct heat, which is perfect for giving them a good sear without drying them out. For thicker seafood (say, a whole fish or a thick salmon steak), you might start on the indirect side until it’s nearly cooked through, then move it to direct heat at the end for a bit of browning.
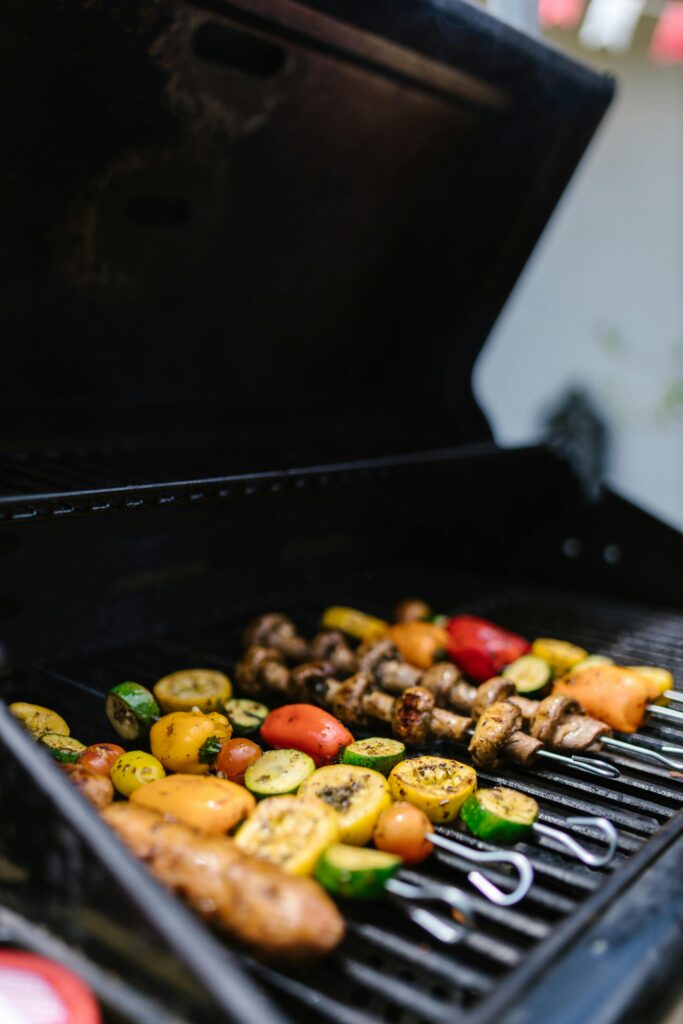
- Vegetables: Many veggies handle direct heat well and develop great flavor from a good char. Quick-cooking vegetables like asparagus, bell peppers, or zucchini slices can go right over the coals. You’ll get nice grill marks and a touch of smokiness. If a vegetable is charring on the outside before it’s tender, just shift it to the indirect side to finish cooking through gently.
Indirect Heat Zone (Cool Side): This side isn’t as immediately searing as the direct zone, but it still gets plenty hot – more like an oven. It’s perfect for foods that need to cook through more slowly or evenly without burning:
- Large Cuts & Bone-In Meats: Big items should almost always start on the indirect side. Think whole chickens or turkeys, large roasts, and bone-in chicken pieces (legs, thighs, quarters). Indirect heat will cook these through to juicy perfection without scorching the outside. You can then slide them over to direct heat for the last few minutes if you want to crisp the skin or char the exterior at the end.
- Ribs and Low-&-Slow BBQ: Classic BBQ cuts that need low, slow cooking (like racks of pork ribs or beef ribs) belong on the indirect side for the long haul. Keep the lid closed and let them slowly tenderize over steady indirect heat. If you’re adding barbecue sauce or a sugary glaze toward the end, do it while the meat is on the indirect side so the sauce doesn’t burn from direct flame. Then, for the grand finale, move the meat to the direct side for a minute or two per side to caramelize the sauce and get a little char.
With two zones, you can always start cooking something on one side and finish on the other. For instance, you might roast a thick pork tenderloin on indirect heat until it’s nearly done, then sear it quickly over direct heat to form a crust. Or you could grill thick potato wedges over direct heat to get some color, then move them indirect to soften all the way through. The possibilities are endless, and the more you grill, the more you’ll get a feel for which foods work best in each zone.
Final Tips and Tricks for Two-Zone Charcoal Grilling
You’re almost ready to get grilling! Before we wrap up, here are a few final tips to help you get the best results from your two-zone setup:

- Preheat the Grill: After setting up your two-zone fire, let the grill heat up for about 10 minutes with the lid closed. A properly preheated (and even lightly oiled) grate will sear food better and help prevent sticking.
- Plan Your Cooking Order: Start slower-cooking items (like bone-in chicken pieces or dense veggies) on the indirect side first since they need more time. Then sear your faster-cooking foods (steaks, burgers, etc.) over direct heat so they’re done just in time. If something finishes early, move it to the indirect side to keep it warm without overcooking.
- Position the Lid Vent: On a kettle grill, point the lid’s top vent toward the indirect side (away from the coals). This way, heat and smoke are drawn across your food before escaping, which means more even cooking and a touch of extra smoky flavor on the indirect side.
- Shut Down Safely: When you’re done cooking, close all the vents to extinguish the coals. This cuts off the oxygen and puts out the fire (while saving any unburned charcoal for next time). Always make sure the coals are completely out and cool before you dispose of the ashes or store your grill.
Now you’ve got all the know-how to master two-zone charcoal grilling. This simple technique gives you much more control over heat and will level up your BBQ game. So go ahead, fire up that grill and have fun with it. Happy grilling!
Grilling can be dangerous. Information provided is for educational purposes only. Always follow proper grilling and food safety guidelines when handling and cooking meat. Use a meat thermometer to ensure safe internal temperatures, wash hands and surfaces thoroughly, and avoid cross-contamination. Information is for educational purposes only
Some posts may contain affiliate links. If you purchase through these links, we may earn a small commission at no cost to you.